First
of all, rest assured that the teachings of Art For
the Sky are aligned with benchmarks
and content standards set by the board of education.
The beauty of an Art For the Sky week is how well
it dovetails with regular school work AND stimulates
the imagination like few things in school can!
Prior
to Art For the Sky week, teachers are encouraged to
excite children about a giant art project that is coming to
their school that is going to help them learn about what it
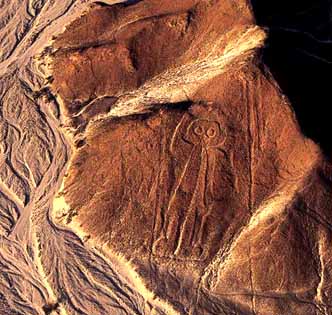
is like to see from a "birds point of view". Thousands of years ago in Peru, native people created gigantic figures in the desert like this one below, called the "astronaut." No one is sure exactly why they did this. There are many theories and you can learn about them via links found on this website. Children love mysteries and this is a big one! You might begin discussions about "perspective." What
differences are there in looking at things obliquely and from
above, from close-up and from far away, i.e., Earth from space,
a leaf through a microscope, etc. What advantages are there
to be able to see from above? Why do you think the ancient
people of the desert did art that only made sense from the
sky. How might this kind of art help us solve our problems
today? And finally, why might it be important to use our imaginations
to learn to see through the eyes of other species.
Math
teachers may want to begin discussing principles of "enlarging
from scale," a technique used by artists throughout history.
Science teachers may want to study the life cycle of the chosen
animal or natural form in the design chosen by the school,
the environmental problems they face, their history and importance
to humans. History teachers can help children examine the role
of symbolism in different cultures. Art teachers
may choose to look at the unique history of art literally written upon the
Earth as geoglyphs and intaglios. Why did the ancients employ
this art form and how can this way of art in it's modern context,
help us solve problems today? How does sky art demonstrate
the power of collaboration.
See our LINKS page for amazing explorations in to the Mystery of Sky Art.
Exciting Classroom Project
Assign each student a single square in a grid of the symbol we will be working with. On their own, they will enlarge this part of the design into a much bigger version by drawing it freehand. Each freshly drawn or colored square of the design is then put up on the classroom wall like a puzzle for an amazing creative and HUGE colorful rendition of the image that will be created on the field!
|
A
wonderful topic to explore is flying dreams. One-third
of people have them which suggests that in a way . . . we are
already aquatinted with our skysight. It's been said that
we only use a small portion of our brains. Could a form of "flight" be
locked inside of us? Children love to explore this topic
with art and in writing. One very fun way to begin to help students to learn to shift their perspective is to have them design skysight glasses like those below!
Have students cut them out from a pattern, writing messages/affirmations on the inside panels before folding over and coloring/decorating them. This is an empowering way for them to breathe their essence into their intentions about awakening their skysight.
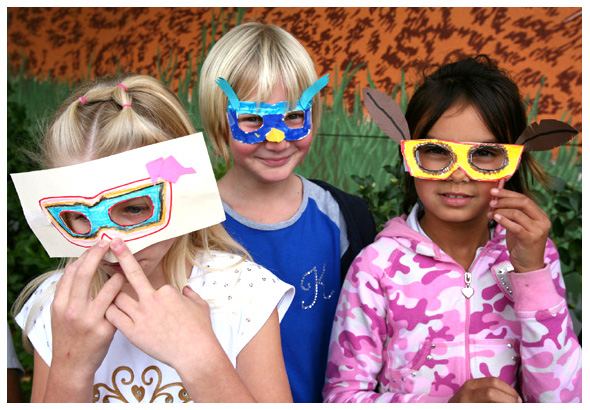
"Dude . . . Get your skysight on!"
Letter to the Earth and Future Generations!
After each project is over consider having your students write a Letter to the Earth and Future Generations. This has proven to be one of the most powerful and heartfelt exercises a young person can do!

Click HERE to learn how to help your students become activists for the Earth!
Two Great Kid Books about the Sky:
Picture the Sky by Barbara Reid
Looking Down by Steve Jenkins
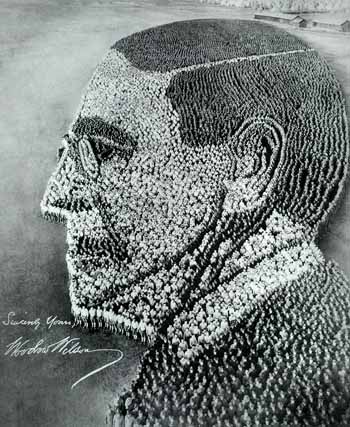
Sky art or aerial art, (basically art meant to be seen from above) has a 3000 year history dating back to the Nazca Lines of Peru. To this day, no one has solved the riddle of why a culture that could not fly (as far as we know) created art that makes no sense on the ground. Crop circles are another sky art phenomenon that intrigues the world with new images appearing mysteriously every year. With regard to making sky art with humans as the art itself, two early 20th century photographers named Arthur Mole and John Thomas are the originators. They arranged as many as 35,000 military personnel at a time into astounding patriotic living insignias such as the Statue of Liberty, Uncle Sam, and president Wilson below.Travel here and be blown away by this work!
Students can play a part in helping create the design of the image that will be used on the field. To enable this, teachers are asked to supply the students with green colored paper which mimics the grass of the athletic field and then ask children to draw their version of a bird, tree, salmon . . . whatever figure the school has chosen for its design. Unlike the ancients who only used light and dark shades of soil and rocks to color their figures, we have colorful clothing to work with!
What C O LORS work best with a green grass background?
What are the C OLO RS that should be avoided?
What colors look good t o g e t h e r?
It's really important for the design to POP OUT!! |
Speaking of green, how green is your school? Do you recycle? Do you have a dishwasher in your cafeteria or do you throw tons of plastic plates away every day? Part of learning to see the big picture with our sky sight is to look at how sustainable our schools are. Check out the wise owl in this super kid friendly sight about helping to make your school ecologically responsible. Did you know that in the average elementary school in America, each students throws away approximately 70lbs of packaging waste . . . that's nearly 20,000 lbs a year! See wastefreelunches.org for some inspiration on how to change things!
Students should look carefully at the "art for the sky" images on this website to learn about the kind of designs that work on grass with human bodies functioning as "paint." Visit the sky gallery and see the difference the elevation above the image makes. Very few people have experimented with "human paint drops." Lets explore together. What kind of image idea can you come up with? More complex design elements can be worked in if one uses material like leaves, recycled cans or paper, thrift shop clothing, etc..
Students
interested in photography, video or journalism have
a unique opportunity to play a part in the documentation
of our Sky Art project. We are happy to provide assistance
in these areas as requested. The local paper always shows
up to take photographs and conduct student interviews providing
unique interactions with the media world.
"Good
Luck! Have Fun!"
|